TABLE OF CONTENTS
- Product Overview
- Quick Reference
- Ports & Functions
- Connecting Mport Space
- Installing an M.2 SSD
- SSD LED Indicator
- Preparing a New SSD in Windows
- Preparing a New SSD in macOS
- Choosing a File System
- 100W USB-C PD Charging
- Using the HDMI Display Output
- Using the SD and microSD Card Readers
- Care & Safety
- Still stuck?
Product Overview
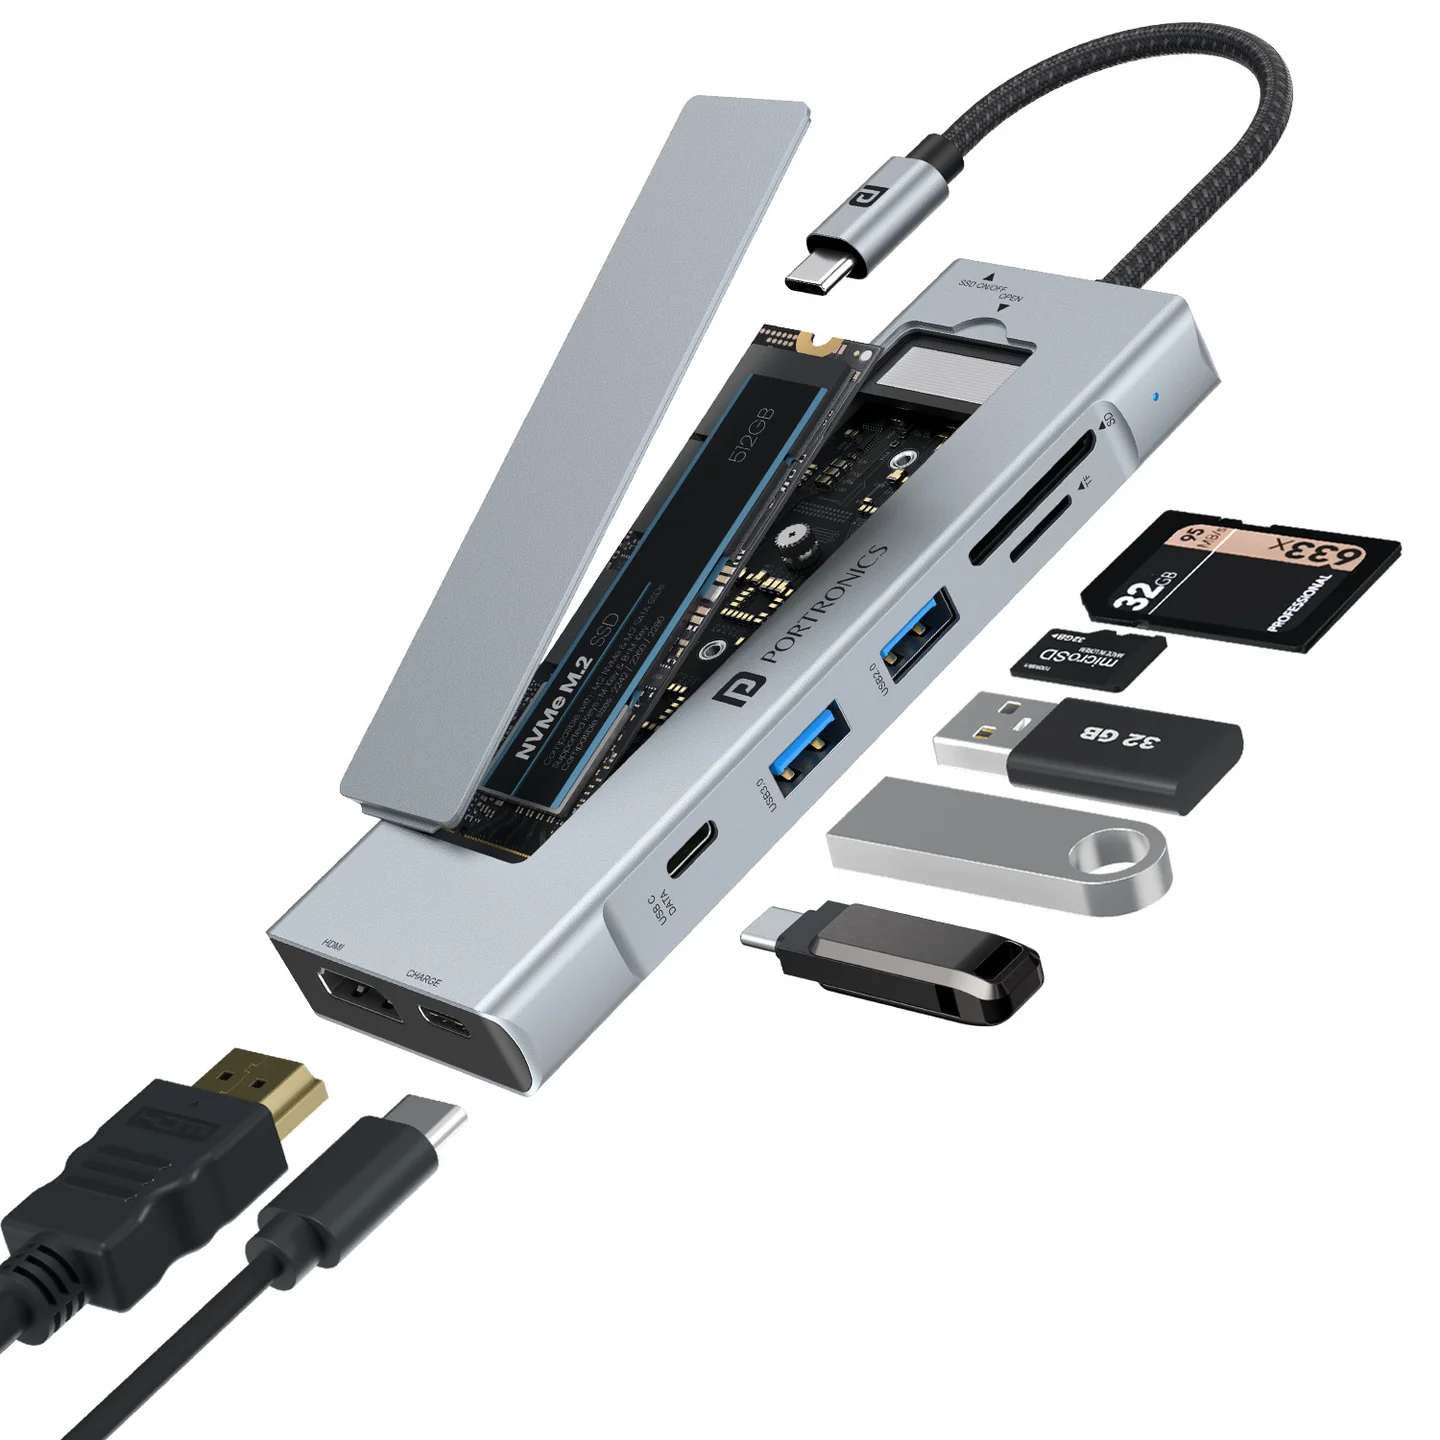
The Portronics Mport Space is an 8-in-1 USB-C hub with an integrated M.2 SSD slot. It expands a compatible USB-C port with display output, high-speed data ports, SD and microSD card readers, and USB-C Power Delivery pass-through charging.
The M.2 SSD is not included.
Quick Reference
| Feature | Details |
|---|---|
| Product | Portronics Mport Space |
| Product Code | POR 3314 |
| Host Connection | USB Type-C |
| SSD Support | M.2 NVMe and SATA |
| Supported SSD Keys | NVMe M-Key; SATA M-Key or B+M-Key |
| Supported SSD Sizes | 2242, 2260 and 2280 |
| HDMI Output | Up to 4K at 30Hz |
| USB-C 3.2 Data Port | Up to 10Gbps |
| USB-A 3.2 Port | Up to 10Gbps |
| USB 2.0 Port | Up to 480Mbps |
| SD Card Reader | Up to 104MB/s |
| TF / microSD Reader | Up to 480MB/s |
| USB-C PD Port | Up to 100W pass-through charging; charging only, no data transfer |
| SSD Indicator | Blue: SSD feature OFF; White: SSD feature ON |
| Body | Aluminium |
| Warranty | 1 year |
Actual transfer speeds and display performance depend on the host device, SSD, memory card, cable and display.
Ports & Functions
| Port / Feature | Function |
|---|---|
| USB-C 3.2 Data | High-speed data transfer up to 10Gbps |
| USB-A 3.2 | High-speed data transfer up to 10Gbps |
| USB 2.0 | Connects lower-speed peripherals such as a keyboard, mouse or printer |
| SD Card Slot | Accesses files on SD cards |
| TF / microSD Slot | Accesses files on microSD cards |
| HDMI | Connects a compatible monitor or TV, up to 4K at 30Hz |
| USB-C PD | Power Delivery charging only; not for data transfer |
| M.2 SSD Slot | Adds storage using a compatible M.2 NVMe or SATA SSD |
| SSD ON/OFF Switch | Turns the SSD feature on or off |
| LED Indicator | Shows whether the SSD feature is enabled |
Important: The USB-C data port does not provide video output. Use the HDMI port for an external display.
Connecting Mport Space
- Connect the hub's USB-C host cable to a compatible USB-C port on your computer or supported device.
- Connect peripherals to the appropriate ports.
- For an external display, connect it to HDMI and select the correct display input.
- For laptop charging, connect a compatible USB-C PD charger to the hub's PD charging port.
- Use the SSD ON/OFF switch to enable the SSD feature when needed.
The host device's USB-C port must support the functionality you want to use. Display output, charging and data capabilities vary by device.
Installing an M.2 SSD
Mport Space supports compatible M.2 NVMe and SATA SSDs in sizes 2242, 2260 and 2280.
- Disconnect the hub from the host device and power source before opening the SSD compartment.
- Remove the SSD cover screw and open the cover.
- Insert the SSD into the slot at a slight angle, aligning the notch with the connector.
- Press the SSD down gently into position.
- Secure it using the supplied screw. Tighten gently; do not overtighten.
- Close the SSD cover and ensure it is aligned properly.
- Reconnect the hub and turn on the SSD feature using the SSD ON/OFF switch.
Do not force the SSD into the slot. Confirm the SSD type, key and size before installation.
SSD LED Indicator
| LED Colour | Meaning |
|---|---|
| Blue | SSD feature is OFF |
| White | SSD feature is ON and ready for use |
Use the SSD ON/OFF switch to control the SSD feature. Turn it off when the SSD is not in use, but do not switch it off while files are being copied, read or written.
Preparing a New SSD in Windows
A new SSD may need to be initialized and formatted before it appears as a usable drive. Formatting an existing drive can erase its data, so back up important files first.
- Connect Mport Space to the Windows computer and turn on the SSD feature.
- Right-click This PC (or My Computer) and select Manage.
- Open Disk Management in the left panel.
- Locate the new SSD shown as Unallocated.
- Right-click the unallocated space and choose New Simple Volume.
- Follow the wizard. Use the default volume size, drive letter and file-system settings if suitable for your needs.
- Select Finish and wait for the process to complete.
- Check that the new volume appears in File Explorer.
Caution: Select the correct disk. Initializing, partitioning or formatting the wrong disk can cause data loss.
Preparing a New SSD in macOS
Formatting erases data on the selected drive. Confirm the correct SSD is selected and back up files you need to keep.
- Connect Mport Space to the Mac and turn on the SSD feature.
- Open Applications → Utilities → Disk Utility.
- Select the new SSD from the sidebar.
- Click Erase.
- Enter a name for the SSD.
- Choose ExFAT for compatibility with both Windows and macOS.
- Choose GUID Partition Map as the scheme.
- Click Erase and wait for the process to finish.
- Confirm the SSD volume appears in Disk Utility/Finder.
Choosing a File System
- ExFAT: recommended when you need read/write access on both Windows and macOS.
- NTFS: macOS may not support writing to NTFS drives by default. If an SSD is readable but cannot be written to on a Mac, use a suitable NTFS driver or back up the drive and reformat it to ExFAT.
Reformatting a drive erases its data. Back up files before changing the file system.
100W USB-C PD Charging
The PD port supports up to 100W pass-through charging when used with compatible equipment.
- Use a USB-C wall charger that supports the required PD output.
- Use a USB-C-to-USB-C cable rated for the intended power.
- Connect the charger to the hub's USB-C PD port, which is marked for charging only.
- Connect the hub to the host device.
The PD port does not transfer data. Actual charging power depends on the adapter, cable, host device and system requirements.
Using the HDMI Display Output
- Connect a compatible display to the hub's HDMI port.
- Select the correct HDMI input on the display.
- Use the computer's display settings to choose mirror or extend mode as supported.
- If no image appears, check whether the host device supports display output through its USB-C port and check the selected display input.
The hub supports up to 4K at 30Hz through HDMI. The separate USB-C data port does not output video.
Using the SD and microSD Card Readers
- Insert the SD card or microSD/TF card into the matching slot.
- Wait for the host device to detect the card.
- Open it in the file manager to access or transfer files.
- Eject the card safely using the operating system's option where available before removing it.
Do not remove a card while files are being copied or written.
Care & Safety
- Disconnect the hub before installing or removing an M.2 SSD.
- Do not force the SSD into its connector.
- Tighten the SSD screw gently; do not overtighten it.
- Keep the hub and ports free from liquid and excessive moisture.
- Do not switch off the SSD during active file transfers or drive activity.
- Eject storage cards and drives safely before removing them.
- Use a compatible, properly rated USB-C PD charger and cable.
- For video output, use HDMI rather than the USB-C data port.
- Back up important files before initializing, partitioning or formatting a drive.
Still stuck?
If the issue persists after performing all troubleshooting steps, please raise a support request.
Our support team will assist you further.
Support
- Visit: www.portronics.com
- Support Portal: support.portronics.com
Was this article helpful?
That’s Great!
Thank you for your feedback
Sorry! We couldn't be helpful
Thank you for your feedback
Feedback sent
We appreciate your effort and will try to fix the article