TABLE OF CONTENTS
- Product Overview
- Compatibility Information
- Package Contents
- Installation Guide
- Step 1 – Install the Base
- Step 2 – Install the Arms
- Step 3 – Install the VESA Plates
- Step 4 – Mount the Monitors
- Step 5 – Adjust Monitor Position
- Step 6 – Adjust Arm Tension
- Step 7 – Cable Management
- Troubleshooting Guide
- 1. Monitor Arms Not Holding Position
- 2. Monitor Arms Dropping Down Automatically
- 3. Monitor Shaking or Wobbling
- 4. Arm Not Fitting in the Suction
- 5. Clamp Mount Not Fitting Properly
- 6. Grommet Mount Becoming Loose
- 7. VESA Plate Not Matching Monitor
- 8. Rotation / Tilt / Swivel Not Working Properly
- 9. Height Adjustment not working
- 10. Dual Monitor Alignment Issue
- 11. Cable Management Problems
- 12. Physical Damage
- Maintenance Guide
- Safety Guidelines
- Support Guidelines
- Need Additional Support?
Product Overview
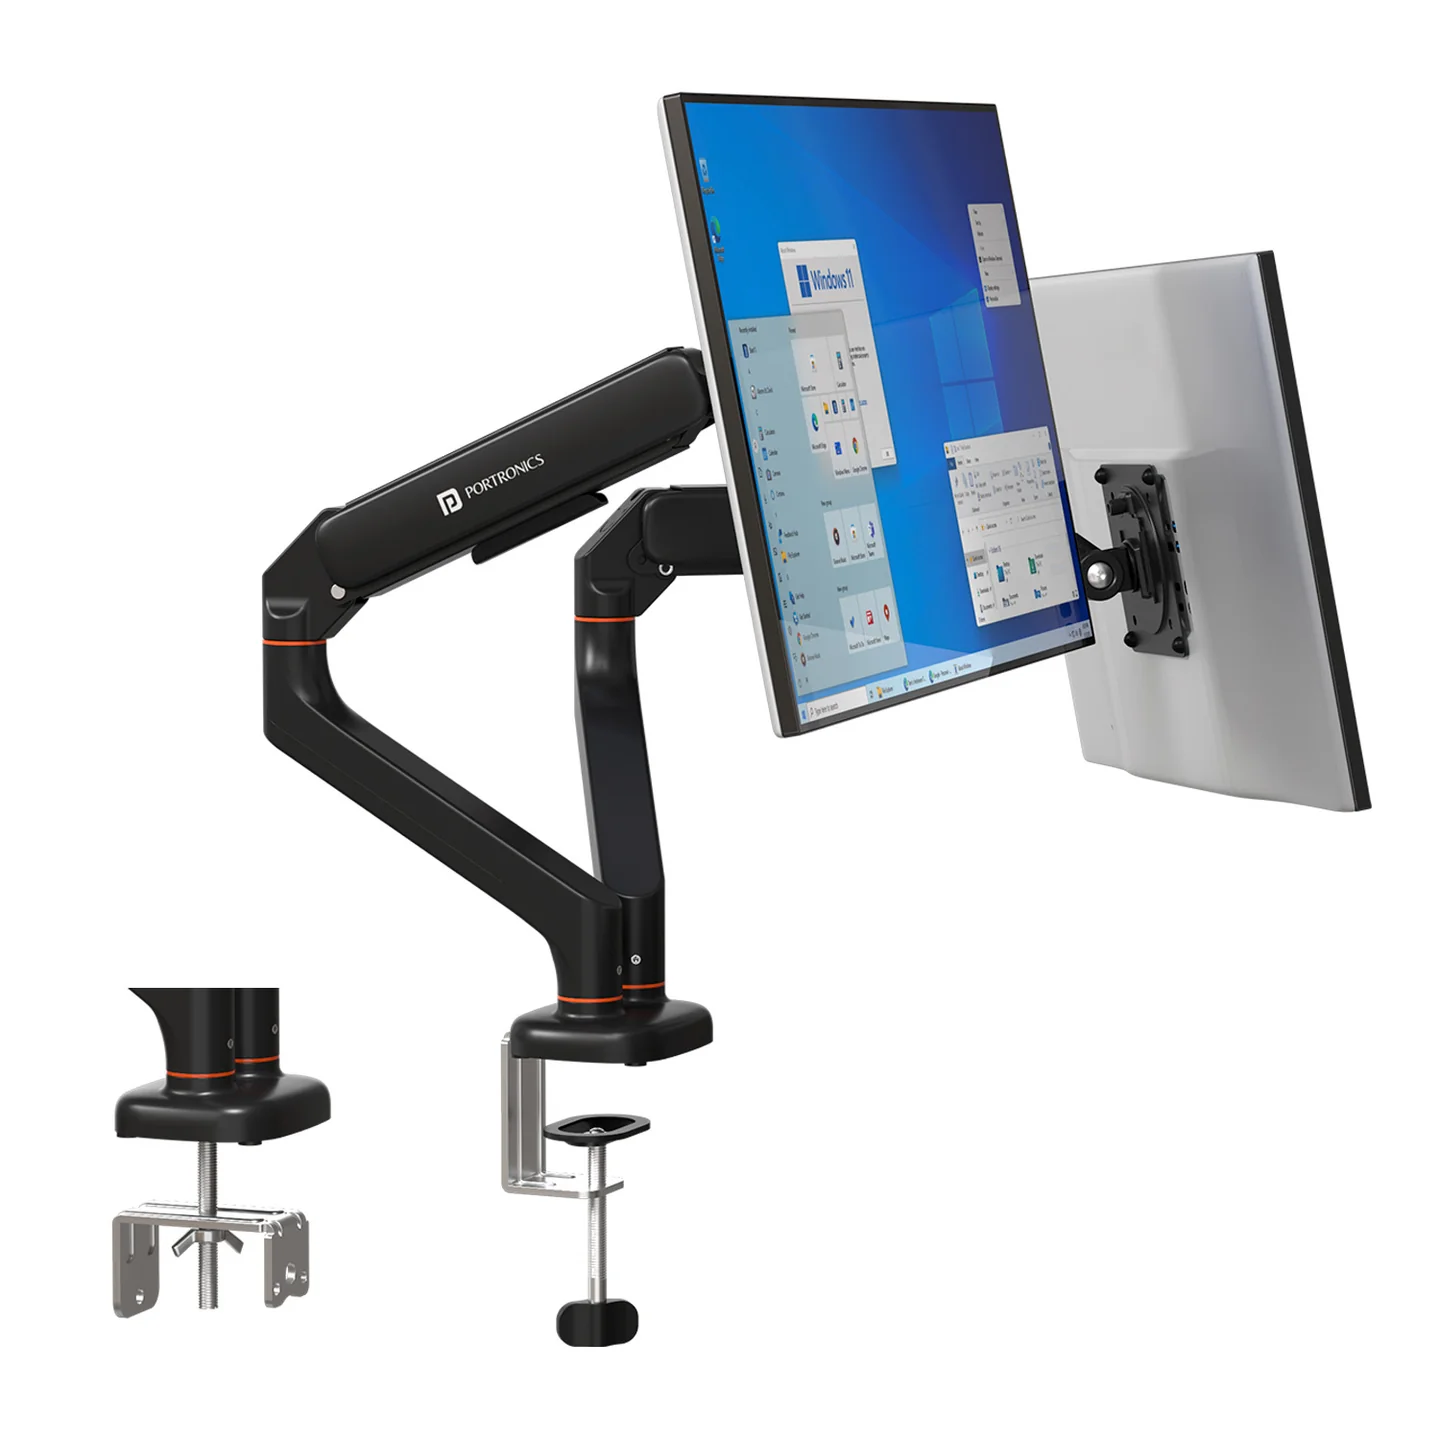
Key Features
- Dual monitor support
- Independent monitor adjustment
- Tilt, swivel, and rotation support
- Desk clamp and grommet mounting options
- Built-in cable management
- Ergonomic workspace setup
- Suitable for flat and curved monitors
Compatibility Information
Supported Monitor Types
- Flat monitors
- Curved monitors
Supported VESA Standards
- 75×75 mm
- 100×100 mm
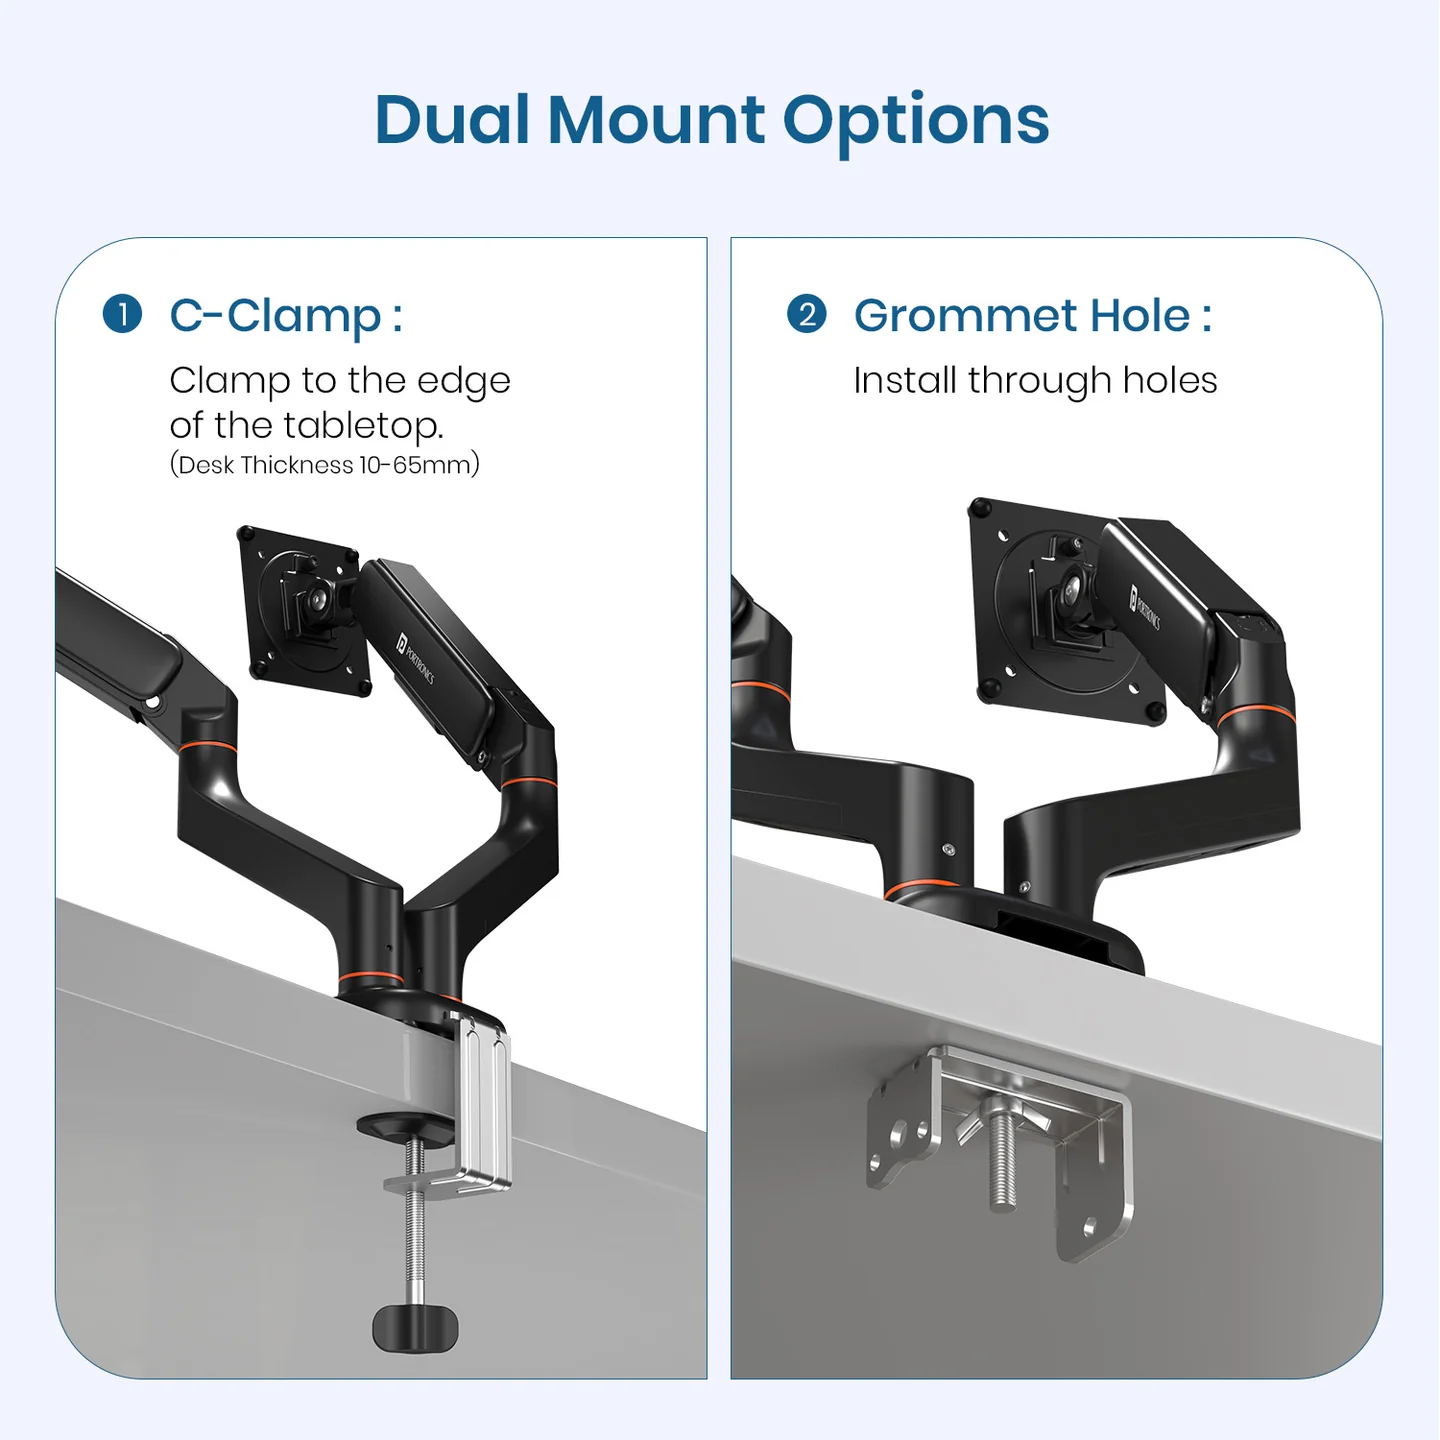
Supported Desk Thickness
- 10mm to 65mm
Installation Types Supported
- Clamp Mount
- Grommet Mount
Package Contents
The package includes:
- Dual monitor arm assembly
- Desk clamp
- Grommet mounting hardware
- Dual VESA mounting plates
- Screws and washers
- Allen keys
- Cable management clips
Please ensure all accessories are available before installation.
Installation Guide
Step 1 – Install the Base
Option A: Clamp Mount Installation
Steps
- Attach the clamp to the base using the supplied screws.
- Position the clamp securely on the desk edge.
- Tighten the clamp firmly.
- Ensure the base remains stable without movement.
Important Notes
- Use only on stable desk surfaces.
- Avoid over-tightening the clamp.
Option B: Grommet Mount Installation
Steps
- Insert the threaded rod through the desk hole.
- Position the base properly.
- Tighten the mounting hardware from below the desk.
- Verify the mount is secure before proceeding.
Important Notes
- Ensure the desk hole size is compatible.
- Tighten evenly for better stability.
Step 2 – Install the Arms
Steps
- Slide both lower arms onto the mounting pole.
- Adjust the arm heights as required.
- Tighten the locking screws using the Allen key.
- Attach the upper arms securely to the lower arms.
Recommended
Double-check all arm joints before mounting the monitors.
Step 3 – Install the VESA Plates
Steps
- Select the correct screws according to each monitor.
- Align the VESA plates with the monitor mounting holes.
- Tighten all screws securely.
- Ensure both VESA plates sit flat against the monitor surfaces.
Supported VESA Sizes
- 75×75 mm
- 100×100 mm
Step 4 – Mount the Monitors
Steps
- Align the VESA plates with the swivel arm heads.
- Slide the monitors into position carefully.
- Ensure both monitors lock securely into place.
- Verify monitor stability before use.
Safety Check
Always hold the monitors securely while mounting.
Step 5 – Adjust Monitor Position
The Aerolift Duo supports:
- Tilt adjustment
- Swivel movement
- Height adjustment
- 90° portrait rotation
Each monitor arm can be adjusted independently for personalized viewing angles.
Tips
- Adjust slowly while supporting the monitors.
- Avoid excessive force during movement.
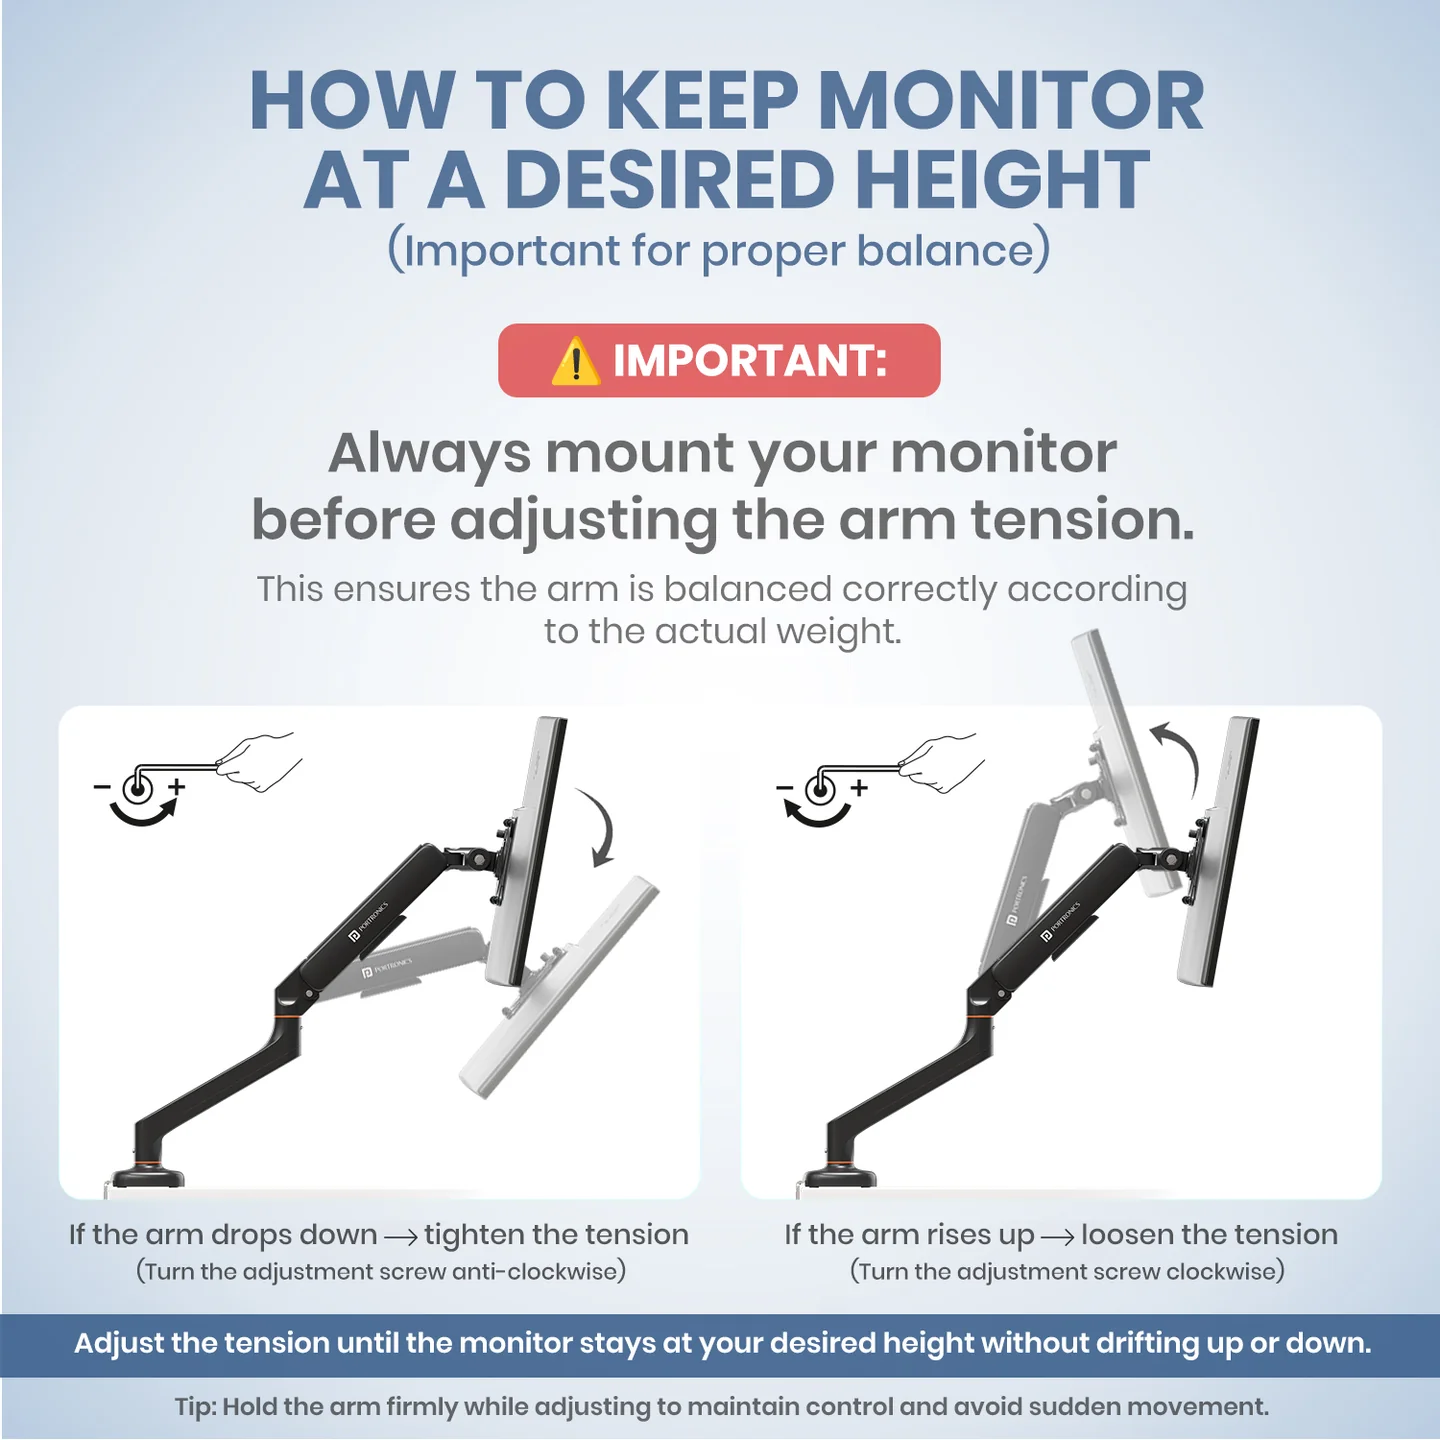
Step 6 – Adjust Arm Tension
If the monitors move too freely or do not stay in position:
Steps
- Use the supplied Allen key.
- Turn clockwise to increase tension.
- Turn anti-clockwise to reduce tension.
- Test monitor movement after every adjustment.
Recommended
Re-adjust tension whenever changing monitor weight or monitor position.
Step 7 – Cable Management
Steps
- Route cables through the built-in cable channels.
- Secure cables using the provided clips.
- Ensure cables move freely during monitor adjustment.
Important Notes
- Avoid cable twisting.
- Keep cables away from pinch points.
- Leave enough cable slack for dual monitor movement.
Troubleshooting Guide
1. Monitor Arms Not Holding Position
Possible Reasons
- Arm tension too loose
- Unsupported monitor weight
- Loose adjustment joints
Troubleshooting Steps
- Tighten the tension screws using the Allen key.
- Verify monitor compatibility and weight support.
- Tighten all arm joints properly.
- Check VESA mounting alignment.
2. Monitor Arms Dropping Down Automatically
Troubleshooting Steps
- Increase arm tension gradually.
- Ensure monitor weight is balanced properly.
- Recheck all locking points and joints.
- Verify secure monitor installation.
3. Monitor Shaking or Wobbling
Possible Reasons
- Loose desk clamp
- Weak desk surface
- Uneven monitor weight distribution
- Improper installation
Troubleshooting Steps
- Tighten the desk clamp securely.
- Ensure both arms are balanced properly.
- Reinstall the monitor arms carefully.
- Tighten all screws and joints.
4. Arm Not Fitting in the Suction
Possible Reasons
- Arm not inserted properly
- Damage on the curved joint area
- Loose screws
- Dust or particles inside the suction joint
Troubleshooting Steps
- Unmount the monitor carefully before performing any adjustments.
- Remove the arm from the suction joint.
- Check for any visible damage on the curved section or joint area.
- Ensure there are no dust particles or obstructions inside the suction mechanism.
- Reinsert the arm properly into the suction joint.
- Tighten the screws accordingly to ensure the arm does not come out during usage while allowing smooth movement.
- Test the arm movement carefully after installation.
Important Note
The arm is designed to move freely for flexible adjustment and positioning. It is not intended to remain completely fixed in one position.
5. Clamp Mount Not Fitting Properly
Troubleshooting Steps
- Verify desk thickness compatibility (10mm–65mm).
- Reinstall the clamp properly.
- Tighten mounting screws evenly.
- Test installation on another desk if required.
6. Grommet Mount Becoming Loose
Troubleshooting Steps
- Tighten the threaded rod securely.
- Ensure the desk hole size is compatible.
- Recheck mounting hardware periodically.
7. VESA Plate Not Matching Monitor
Troubleshooting Steps
- Verify monitor VESA compatibility.
- Use the correct screw set.
- Align mounting holes carefully.
- Ensure the VESA plates sit flat on both monitors.
8. Rotation / Tilt / Swivel Not Working Properly
Troubleshooting Steps
- Adjust arm tension properly.
- Tighten loose adjustment joints carefully.
- Avoid forcing monitor movement.
- Test movement without additional pressure.
9. Height Adjustment not working
Troubleshooting Steps
- Tighten the height locking screws properly.
- Reposition the arms and test again.
- Ensure monitor weight is balanced evenly.
10. Dual Monitor Alignment Issue
Common Problems
- Uneven monitor height
- Misaligned viewing angles
- Different monitor positions
Troubleshooting Steps
- Adjust both monitor heights individually.
- Align swivel and tilt angles carefully.
- Recheck arm tension on both sides.
- Ensure both monitors are mounted evenly.
11. Cable Management Problems
Common Problems
- Hanging cables
- Cables getting stuck
- Restricted arm movement
Troubleshooting Steps
- Re-route cables properly through channels.
- Use provided cable clips.
- Leave enough cable slack for movement.
12. Physical Damage
Common Types of Damage
- Bent arms
- Broken clamp
- Cracked plastic parts
- Loose adjustment joints
Important Notes
Physical or accidental damage will not be covered under warranty.
Maintenance Guide
Cleaning Instructions
- Use a dry cloth only.
- Avoid chemicals or liquids.
Periodic Maintenance
- Check screw tightness regularly.
- Recheck arm tension periodically.
- Inspect mounting stability after monitor changes.
Safety Guidelines
- Install only on stable desk surfaces.
- Do not exceed supported monitor weight.
- Keep fingers away from moving joints.
- Keep cables away from pinch points.
- Ensure all screws are tightened properly before use.
Support Guidelines
For faster assistance, please keep the following ready before contacting support:
- Valid purchase invoice
- Product images
- Installation images
- Short video clearly showing the issue
- Monitor model details
- Desk setup images
Need Additional Support?
If the issue still persists after troubleshooting:
- Reinstall the monitor arms carefully.
- Verify monitor compatibility.
- Recheck all mounting and adjustment points.
- If the issue persists after performing all troubleshooting steps, please Click here raise a support request.
Our support team will assist you further.
Was this article helpful?
That’s Great!
Thank you for your feedback
Sorry! We couldn't be helpful
Thank you for your feedback
Feedback sent
We appreciate your effort and will try to fix the article